11.2.3 Face Detection
MediaPipe Face Mesh returns 478 landmark points per detected face. Feed them into Delaunay triangulation (3.3.5) and you get an instant low-poly portrait.
Overview
Face detection — finding where faces are in an image — is one of the oldest computer-vision applications. The Viola-Jones cascade classifier (2001) made it real-time on desktop hardware [1]; deep-net detectors made it real-time on mobile in the 2010s. Today, Google’s MediaPipe Face Mesh (2019) is the de facto choice: 478 facial landmarks per detected face, 30+ fps on a laptop CPU, runs in the browser via WebAssembly [2].
This lesson takes those 478 landmarks and feeds them into the Delaunay triangulation primitive from 3.3.5. The result is an instant low-poly portrait: each triangle filled with the average colour of the corresponding region in the original photo. Three steps — detect landmarks, triangulate them, colour each triangle — yield striking geometric portraits that have been all over Instagram filters since 2017.
Learning objectives
- Distinguish face detection (where are the faces?) from face recognition (who is this person?). This lesson is detection only.
- Run MediaPipe Face Mesh to extract 478 landmark points per face.
- Triangulate the landmarks with
scipy.spatial.Delaunay(the same primitive from 3.3.5). - Fill each triangle with the average colour of the region it covers in the source image.
Quick start — low-poly face
import cv2
import numpy as np
from scipy.spatial import Delaunay
import mediapipe as mp
from mediapipe.tasks import python
from mediapipe.tasks.python import vision

image = cv2.cvtColor(cv2.imread('sample_face.jpg'), cv2.COLOR_BGR2RGB)
mp_img = mp.Image(image_format=mp.ImageFormat.SRGB, data=image)

detector = vision.FaceLandmarker.create_from_options(
    vision.FaceLandmarkerOptions(
        base_options=python.BaseOptions(model_asset_path='face_landmarker.task'),
        num_faces=1,
    ))
landmarks = np.array([
    [lm.x * image.shape[1], lm.y * image.shape[0]]
    for lm in detector.detect(mp_img).face_landmarks[0]
])

# Triangulate
tri = Delaunay(landmarks)

# Fill each triangle with the average colour of its centroid
output = np.zeros_like(image)
for simplex in tri.simplices:
    pts = landmarks[simplex].astype(np.int32)
    centroid = pts.mean(axis=0).astype(int)
    color = image[centroid[1], centroid[0]].tolist()
    cv2.fillPoly(output, [pts], color)

cv2.imwrite('lowpoly.png', cv2.cvtColor(output, cv2.COLOR_RGB2BGR))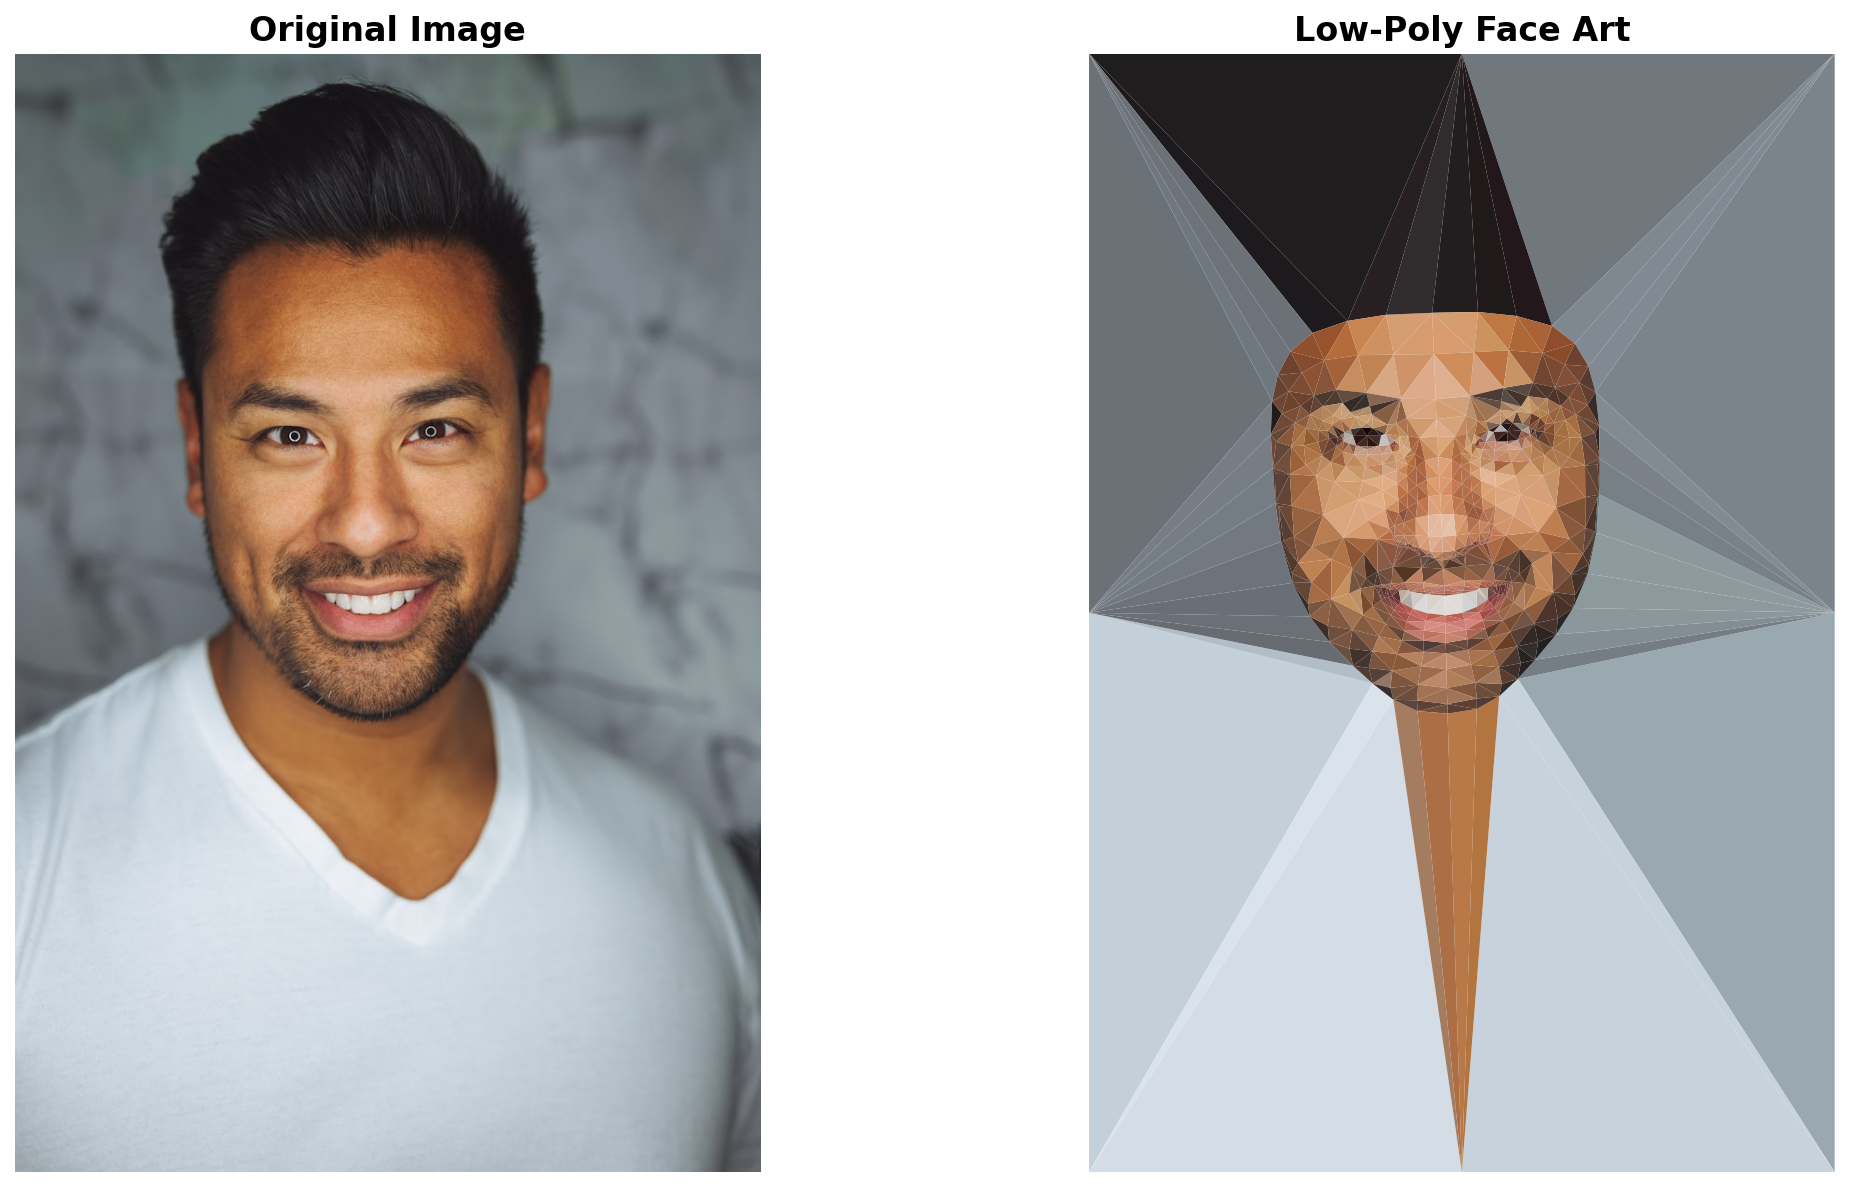
Core concepts
Concept 1 — Detection vs. recognition
These two terms are constantly confused in news coverage but mean different things:
- Face detection — find rectangles/landmarks where faces appear in an image. Doesn’t know who’s whose face. Privacy-neutral.
- Face recognition — given a detected face, look it up in a database to identify the person. Privacy-sensitive; most jurisdictions regulate it heavily.
This lesson is detection only. We never compare faces against any database, never produce identity claims, never trigger access controls. The 478 landmarks are geometric features (centre of nose, corners of eyes, edges of jaw) — they describe the face’s shape, not the face’s identity. Use them for art and animation; reach for recognition libraries (and a lawyer) only if you genuinely need identification.
Concept 2 — MediaPipe Face Mesh
MediaPipe’s FaceLandmarker model takes an RGB image and returns one landmark list per detected face. Each landmark is a normalised (x, y, z) in [0, 1]. Multiply by image width/height to get pixel coordinates:
result = detector.detect(mp_image)
for face in result.face_landmarks:
    landmarks = np.array([
        [lm.x * W, lm.y * H, lm.z * W] for lm in face
    ])  # shape (478, 3)
The 478 points are organised into named regions: 27 around each eye, 80 around the mouth, 40 along the jawline, etc. Face Mesh’s documentation [3] includes a connectivity diagram showing which points form which features. You can filter to specific regions (jawline only, eyes only) by indexing the landmarks array with the published index ranges.
Concept 3 — Landmark Delaunay + colour fill
With 478 landmark points, scipy.spatial.Delaunay(landmarks) computes a Delaunay triangulation in milliseconds. The output tri.simplices is an (N, 3) array of vertex indices into your landmarks array, one row per triangle.
The colour-fill step is per-triangle:
output = np.zeros_like(image)
for simplex in tri.simplices:
    pts = landmarks[simplex].astype(np.int32)
    centroid = pts.mean(axis=0).astype(int)
    color = image[centroid[1], centroid[0]].tolist()
    cv2.fillPoly(output, [pts], color)
For each triangle:
- Compute centroid (mean of three vertices).
- Sample the source image at the centroid → one RGB colour.
- Fill the triangle with that colour using
cv2.fillPoly.
The result reads as a low-poly portrait: facial structure is preserved (the triangulation tracks the landmark mesh), but micro-detail is averaged away. Output looks like a stylised geometric portrait.

Exercises
Three exercises in Execute → Modify → Create order: render the demo, sweep parameters, then build a real-time version.
Run the low-poly face
Run lowpoly_face.py on the bundled sample_face.jpg. The script writes lowpoly_face_output.png.
Reflection questions
- The pipeline uses 478 landmarks. What does the result look like with fewer (say, the 68-point Dlib landmark set)?
- Why is the low-poly rendition recognisably the same person?
- The colour is sampled at each triangle’s centroid. What does using the median colour over the triangle instead look like?
Answers
Fewer landmarks — the 68-point dlib set predates Face Mesh and produces a coarser triangulation. Big triangles average more colour and lose more detail; the result reads as more abstract but less recognisable.
Person preservation — the triangulation tracks facial features (the eyes, nose, mouth, jawline are densely sampled in Face Mesh). Triangles at those features have colour distributions matching the person’s actual face. The macro-geometry plus regional colour is enough for identification.
Median vs centroid colour — median is more robust to outlier pixels (e.g. a stray bright reflection on an eyebrow). The result looks slightly more “painterly” — colour transitions are smoother. Computationally more expensive but worth it for the colour quality.
Sweep pipeline parameters
Goals
- Edge overlay. Draw the Delaunay triangle edges in black on top of the colour fill. The mesh structure becomes visible.
- Region filtering. Use only landmarks 0–17 (jaw outline). The triangulation covers only the chin/cheek area.
- Multi-face. Set
num_faces=4. Process a group photo; each face gets its own triangulation.
Goal 1 — what to expect
Triangle edges drawn over the fill produce a “geometric mesh” portrait — explicitly low-poly look. The pre-made lowpoly_face_edges.png in the lesson assets shows this effect.
Goal 2 — what to expect
Only the jawline triangulates. Useful for cosmetic-style overlays (jaw filler simulation, chin sculpting) where the rest of the face should remain photo-realistic.
Goal 3 — what to expect
Each face’s landmarks triangulate independently. Use this for group portraits or crowd shots — every face gets its own low-poly treatment.
Real-time low-poly webcam
Build a real-time version that triangulates the face from a live webcam feed. Use MediaPipe’s LIVE_STREAM running mode.
import cv2
import numpy as np
from scipy.spatial import Delaunay
import mediapipe as mp
from mediapipe.tasks import python
from mediapipe.tasks.python import vision

# TODO 1: create FaceLandmarker with running_mode=LIVE_STREAM

# TODO 2: open VideoCapture(0)

# TODO 3: per frame: convert BGR to RGB, build mp.Image,
#         detect, triangulate, render, imshow
Hints
options = vision.FaceLandmarkerOptions(
    base_options=python.BaseOptions(model_asset_path='face_landmarker.task'),
    num_faces=1,
    running_mode=vision.RunningMode.IMAGE,    # IMAGE works per-frame; LIVE_STREAM is async
)
detector = vision.FaceLandmarker.create_from_options(options)

cap = cv2.VideoCapture(0)
while True:
    ok, bgr = cap.read()
    rgb = cv2.cvtColor(bgr, cv2.COLOR_BGR2RGB)
    mp_img = mp.Image(image_format=mp.ImageFormat.SRGB, data=rgb)
    result = detector.detect(mp_img)
    # ... triangulate + render as in quick start
    cv2.imshow('lowpoly', cv2.cvtColor(output, cv2.COLOR_RGB2BGR))
    if cv2.waitKey(1) & 0xFF == ord('q'):
        break
The IMAGE running mode processes one frame at a time synchronously — good enough for 15–25 fps on a laptop. LIVE_STREAM is asynchronous and higher-throughput but more complex API.
Complete solution
realtime_lowpoly.py in the lesson assets is a full implementation. Run it with a webcam attached and watch your face become a moving low-poly portrait. The same pipeline drives countless Instagram and Snapchat filters.
Make it your own
- Edges only. Render the triangulation as black lines on white background — geometric portrait drawing.
- Animated triangles. Each triangle’s colour transitions smoothly between frames using 8.1.3’s interpolation. The portrait “breathes.”
- Face swap. Detect landmarks on two faces; warp the source’s triangle colours onto the destination’s triangulation. Same primitive, more sophisticated mapping.
Downloads
lowpoly_face.py — still-image reference realtime_lowpoly.py — webcam version face_landmarks.py — landmark detection only face_detection_basic.py — bounding-box detection sample_face.jpg — CC0 sample portraitSummary
Common pitfalls to avoid
- Confusing BGR and RGB. OpenCV reads BGR; MediaPipe expects RGB. Always
cvtColorbefore passing to the detector. - Centroid-only colour sampling. One pixel per triangle misses detail. Use mean over triangle interior for nicer colour quality.
- Forgetting
num_faces. Default is 1; for group photos set higher. - Treating detection as recognition. The 478 landmarks describe shape, not identity. Don’t repurpose this pipeline for access control.
References
- [1] Viola, P., & Jones, M. J. (2004). Robust real-time face detection. International Journal of Computer Vision, 57(2), 137–154. doi:10.1023/B:VISI.0000013087.49260.fb
- [2] Lugaresi, C., Tang, J., Nash, H., et al. (2019). MediaPipe: A framework for building perception pipelines. arXiv preprint, arXiv:1906.08172. arxiv.org/abs/1906.08172
- [3] Google. (2024). MediaPipe Face Mesh Documentation. developers.google.com
- [4] Snap Inc. (2015). Snap acquires Looksery for Lenses launch. Snap Inc. press release.
- [5] Bazarevsky, V., Kartynnik, Y., Vakunov, A., Raveendran, K., & Grundmann, M. (2019). BlazeFace: Sub-millisecond neural face detection on mobile GPUs. arXiv preprint, arXiv:1907.05047.
- [6] Delaunay, B. (1934). Sur la sphère vide. Bulletin de l’Académie des Sciences de l’URSS, 793–800.
- [7] Szeliski, R. (2022). Computer Vision: Algorithms and Applications (2nd ed.). Springer. ISBN 978-3-030-34371-2.