11.1.1 Webcam Processing
Turn a webcam into a 30 fps NumPy array stream. Capture → process → display loop, with frame differencing as the canonical 'detect motion' demo.
Overview
A webcam is a NumPy array generator. Every 30-millisecond tick it produces a new (H, W, 3) array, the same data structure you have manipulated since lesson 1.1.1. The job of an interactive system is to put a transformation between capture and display — anything from a colour filter to motion detection to a full pose-estimation network. The pipeline is identical regardless of complexity:
while True: frame = capture(); processed = transform(frame); display(processed)
This lesson covers the canonical loop with OpenCV’s VideoCapture, three classes of real-time operators (channel, blur, edge), and the most-used interactive-systems primitive: frame differencing for motion detection. The code is OpenCV-flavoured because that’s the dominant ecosystem; the operators are the NumPy ones you already know.
Learning objectives
- Open and read a webcam stream via OpenCV’s
VideoCaptureAPI, releasing the device cleanly. - Apply real-time per-frame transformations (grayscale, blur, edge detection) without dropping below 30 fps.
- Implement frame-differencing motion detection: store previous frame,
absdiff, threshold, overlay. - Recognise that every interactive-system input — webcam, mic, MIDI, Kinect — produces the same pipeline shape.
Quick start — capture loop
import cv2

cap = cv2.VideoCapture(0)   # 0 = default webcam; can also be a video filename

while True:
    ok, frame = cap.read()
    if not ok:
        break
    cv2.imshow('Webcam', frame)
    if cv2.waitKey(1) & 0xFF == ord('q'):
        break

cap.release()
cv2.destroyAllWindows()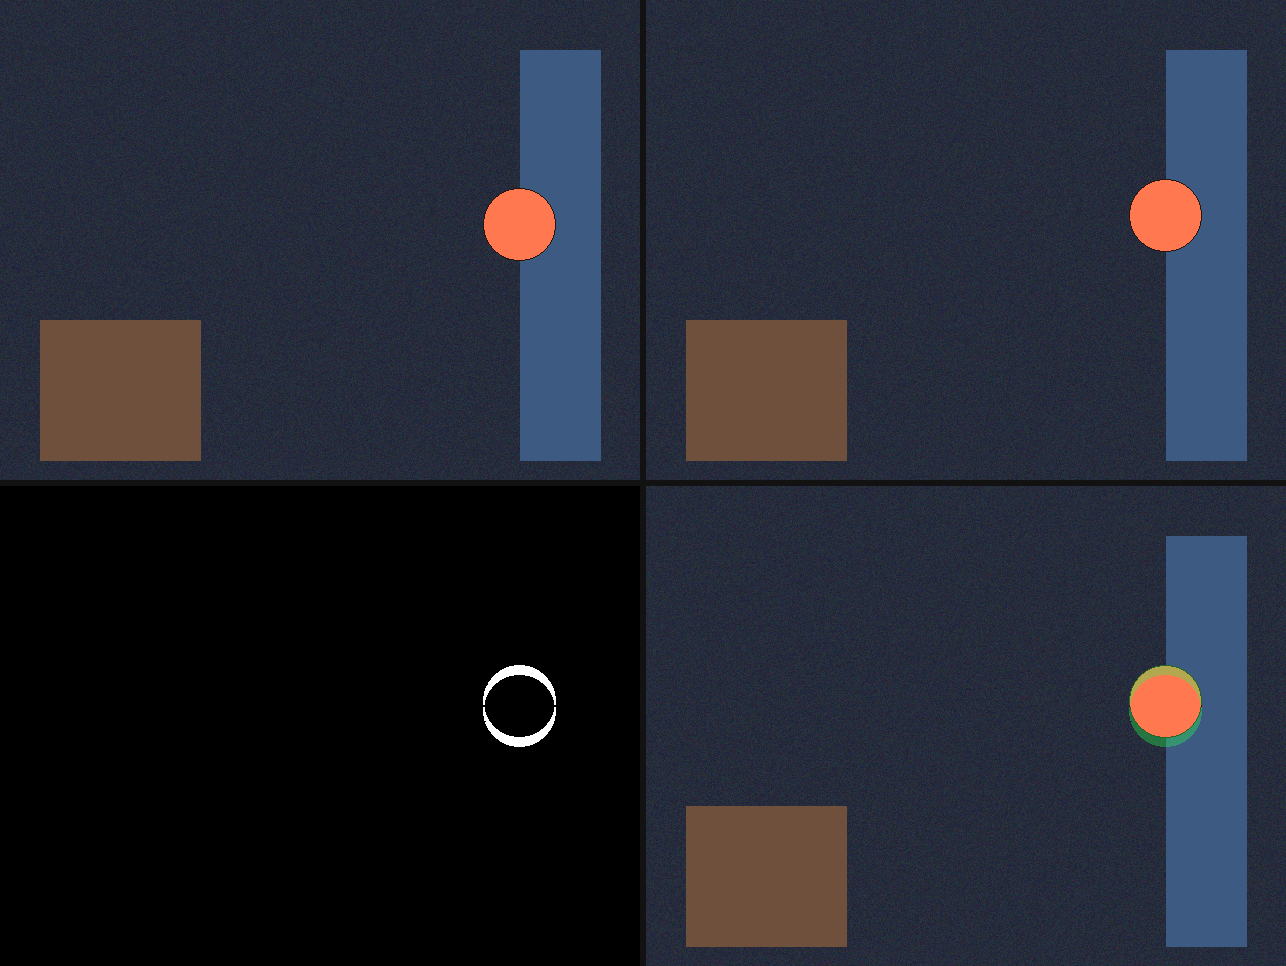
Core concepts
Concept 1 — The capture-process-display loop
Every interactive video application has the same three-step inner loop:
- Capture. Read one frame as a NumPy array.
ret, frame = cap.read()returnsFalseon disconnect or end-of-file; always checkretbefore processing. - Process. Apply zero or more transformations. The frame is
uint8BGR (OpenCV’s quirk — not RGB); convert to grayscale, blur, threshold, anything from your NumPy toolkit. - Display.
cv2.imshow(window, image)paints a window;cv2.waitKey(1)gives the GUI 1 ms to update and polls for a keypress. WithoutwaitKey, no frame ever displays.
After the loop, cap.release() and cv2.destroyAllWindows() clean up. Leaving the device locked is a common bug — the camera is unusable until your Python process exits or the OS recovers.
Concept 2 — Real-time per-frame operators
Since each frame is a NumPy array, every Module 03 transformation works in real time. The OpenCV equivalents are usually one line:
gray    = cv2.cvtColor(frame, cv2.COLOR_BGR2GRAY)   # luma
blurred = cv2.GaussianBlur(frame, (21, 21), 0)      # 21x21 Gaussian
edges   = cv2.Canny(gray, 50, 150)                  # Canny edges
mirror  = cv2.flip(frame, 1)                        # horizontal flip
The constraint is frame budget: at 30 fps you have ~33 ms per frame for capture + process + display. A 640×480 Gaussian blur takes ~2 ms; a Canny edge detector takes ~5 ms; reading the frame and showing the result eats another ~10 ms. Most interactive applications fit a handful of operators per frame comfortably.
Concept 3 — Frame-differencing motion detection
The cheapest motion detector compares consecutive frames. Pixels that change significantly between $t-1$ and $t$ are “moving”:
prev_gray = cv2.GaussianBlur(cv2.cvtColor(prev, cv2.COLOR_BGR2GRAY), (21, 21), 0)

while True:
    ok, cur = cap.read()
    cur_gray = cv2.GaussianBlur(cv2.cvtColor(cur, cv2.COLOR_BGR2GRAY), (21, 21), 0)

    diff = cv2.absdiff(prev_gray, cur_gray)         # per-pixel |a - b|
    _, motion = cv2.threshold(diff, 25, 255, cv2.THRESH_BINARY)

    out = cur.copy()
    out[motion > 0] = [0, 255, 0]                   # green where motion

    prev_gray = cur_gray.copy()
    cv2.imshow('Motion', out)
    if cv2.waitKey(1) & 0xFF == ord('q'): break
Two pre-processing tricks are doing real work here. First, convert to grayscale before comparing — colour comparisons would triple the work and add no useful information for motion. Second, blur before differencing — a 21×21 Gaussian removes per-pixel sensor noise that would otherwise produce false-positive “motion.”

Exercises
Three exercises in Execute → Modify → Create order: run the capture loop, add a filter, then build a motion detector.
Run the capture loop
Run webcam_capture.py. Press s to save a frame; q to quit. If you don’t have a webcam, run synthetic_webcam.py instead, which simulates the same pipeline on a synthetic scene.
Reflection questions
- What is the shape of
frame? What dtype? - Why does the OpenCV-saved PNG sometimes look red-blue inverted in another viewer?
- If you remove
cv2.waitKey(1), what happens?
Answers
Shape and dtype — (H, W, 3) uint8. Typical webcams: 480p (480, 640, 3), 720p (720, 1280, 3), 1080p (1080, 1920, 3). Always uint8 (0–255 per channel).
Red-blue swap — OpenCV writes PNGs assuming BGR order. Viewers and other libraries (PIL, matplotlib) read them as RGB. Fix with cv2.cvtColor(frame, cv2.COLOR_BGR2RGB) before saving with non-OpenCV writers.
No waitKey — the OpenCV window never repaints, even though imshow is called every iteration. waitKey is the call that flushes the display queue. Drop it and you get a frozen window.
Add three filters
Modify webcam_effects.py (or the synthetic version) to apply three real-time effects.
Goals
- Sepia. Apply the standard sepia matrix per pixel.
- Pixelate. Resize down to 64×48 with nearest-neighbour, then back up.
- Mirror. Horizontal flip — selfie convention.
Goal 1 — sepia
sepia_matrix = np.array([[0.272, 0.534, 0.131],
                         [0.349, 0.686, 0.168],
                         [0.393, 0.769, 0.189]])
sepia = cv2.transform(frame, sepia_matrix)
sepia = np.clip(sepia, 0, 255).astype(np.uint8)
cv2.transform applies a 3×3 matrix to each pixel’s BGR vector. The matrix encodes the warm “old photograph” colour shift.
Goal 2 — pixelate
small = cv2.resize(frame, (64, 48), interpolation=cv2.INTER_AREA)
pixelated = cv2.resize(small, (frame.shape[1], frame.shape[0]),
                       interpolation=cv2.INTER_NEAREST)
Down-then-up resampling with nearest-neighbour preserves the chunky blocks. Linear interpolation on the up-step would blur them away.
Goal 3 — mirror
mirror = cv2.flip(frame, 1) # 1 = horizontal, 0 = vertical, -1 = bothMirroring is what video-call apps do so the user sees a “right-side-up” reflection of themselves.
Build a motion detector
Implement the frame-differencing motion detector from scratch using the starter template. The current and previous frames are converted to grayscale, blurred, differenced, and thresholded.
webcam_starter.py — frame differencing skeletonimport cv2
import numpy as np
cap = cv2.VideoCapture(0)
ok, prev = cap.read()
prev_gray = cv2.GaussianBlur(cv2.cvtColor(prev, cv2.COLOR_BGR2GRAY), (21, 21), 0)
while True:
ok, cur = cap.read()
cur_gray = cv2.GaussianBlur(cv2.cvtColor(cur, cv2.COLOR_BGR2GRAY), (21, 21), 0)
# TODO 1: per-pixel absolute difference between current and previous gray frames
# TODO 2: threshold the diff to a binary motion mask at value 25
# TODO 3: copy the current frame, paint green wherever the mask is set
prev_gray = cur_gray.copy()
cv2.imshow('Motion', out)
if cv2.waitKey(1) & 0xFF == ord('q'):
break
cap.release()
cv2.destroyAllWindows()Hints
diff = cv2.absdiff(prev_gray, cur_gray)
_, motion = cv2.threshold(diff, 25, 255, cv2.THRESH_BINARY)
out = cur.copy()
out[motion > 0] = [0, 255, 0]
absdiff and threshold are the two key OpenCV calls; advanced-indexed assignment paints the green overlay in one line.
Make it your own
- Motion trail. Accumulate motion masks across the last 10 frames with
trail = trail * 0.9 + motion * 0.1and displaytrail. Motion leaves a fading ghost. - Audio trigger. Sum the motion mask each frame; if it exceeds a threshold, play a sound via
pygame.mixer. The webcam becomes an “activity-aware” instrument. - Background subtraction. Replace consecutive-frame differencing with
cv2.createBackgroundSubtractorMOG2(). Static cameras get vastly more robust motion segmentation.
Downloads
webcam_capture.py — minimal capture loop webcam_effects.py — real-time filters background_subtraction.py — motion detection synthetic_webcam.py — no-camera demoSummary
Common pitfalls to avoid
- Forgetting
cap.release(). Locks the device until process exit. - Skipping
cv2.waitKey. The window never updates; debugging is mysterious. - Ignoring
ret. AFalsereturn on disconnect crashes the next line. - Comparing colour frames directly. 3× the work for no benefit; convert to grayscale first.
References
- [1] Bradski, G., & Kaehler, A. (2008). Learning OpenCV: Computer Vision with the OpenCV Library. O’Reilly. ISBN 978-0-596-51613-0.
- [2] Piccardi, M. (2004). Background subtraction techniques: A review. IEEE International Conference on Systems, Man and Cybernetics, 4, 3099–3104. doi:10.1109/ICSMC.2004.1400815
- [3] Szeliski, R. (2022). Computer Vision: Algorithms and Applications (2nd ed.). Springer. ISBN 978-3-030-34371-2.
- [4] OpenCV Development Team. (2024). VideoCapture Class Reference. docs.opencv.org
- [5] Gonzalez, R. C., & Woods, R. E. (2018). Digital Image Processing (4th ed.). Pearson. ISBN 978-0-13-335672-4.
- [6] Stauffer, C., & Grimson, W. E. L. (1999). Adaptive background mixture models for real-time tracking. IEEE CVPR, 2, 246–252. doi:10.1109/CVPR.1999.784637
- [7] Harris, C. R., Millman, K. J., van der Walt, S. J., et al. (2020). Array programming with NumPy. Nature, 585, 357–362. doi:10.1038/s41586-020-2649-2