1.1.1 Images as Arrays & RGB
Treat every digital image as a NumPy array of intensity values; build colour from scratch by writing red, green, and blue channels by hand.
Overview
Digital images are arrays of numbers. A single 4K image contains 26 million pixels. Three integers per pixel, each specifying the intensity of the red, green, and blue channels. Manipulating these arrays directly opens every technique from vintage photo filters to training convolutional networks.
Learning objectives
- Understand that images are 2D arrays of numerical values (grayscale).
- Recognise the relationship between array values (0–255) and brightness.
- Extend to 3D NumPy arrays with RGB channels for colour images.
- Grasp the additive colour model and why computers use RGB.
Quick start — your first colourful image
Run this code to create a simple image:
import numpy as np
from PIL import Image

# Create a 200x200 image with 3 color channels (RGB)
image = np.zeros((200, 200, 3), dtype=np.uint8)

# Top half: cyan
image[:100, :, 1] = 255  # Green channel
image[:100, :, 2] = 255  # Blue channel

# Bottom half: magenta
image[100:, :, 0] = 255  # Red channel
image[100:, :, 2] = 255  # Blue channel

# Convert to PIL and save
pil_image = Image.fromarray(image)
pil_image.save('cyan_magenta.png')Core concepts
Concept 1 — Grayscale, the foundation
Before diving into colour, the simplest digital image: grayscale.
A grayscale image is a 2D grid of pixels, where each pixel has a brightness value:
- 0 = black (no light)
- 255 = white (maximum light)
- 128 = medium gray (half intensity)
import numpy as np
from PIL import Image

# Create a 200x200 array filled with medium gray
array = np.zeros((200, 200), dtype=np.uint8)
array += 128

# PIL interprets 2D arrays as grayscale automatically
image = Image.fromarray(array)
image.save('gray.png')
The Image.fromarray() function from Pillow converts NumPy arrays into displayable images.
The uint8 data type
The dtype=np.uint8 parameter is required for image arrays:
- u = unsigned (no negative numbers)
- int = integer (whole numbers only)
- 8 = 8 bits per value (range: 0 to 255)
# Correct: uint8 for standard images
array = np.zeros((100, 100), dtype=np.uint8)

# Wrong: without dtype specification
array = np.zeros((100, 100))   # Defaults to float64 — PIL expects uint8 for 0-255 images
Array shape and coordinates
NumPy arrays use [row, column] indexing:
- row = y-coordinate (vertical position, 0 at top)
- column = x-coordinate (horizontal position, 0 at left)
- Shape:
(height, width)— height (rows) comes first.
array = np.zeros((200, 300), dtype=np.uint8)  # 200 tall, 300 wide

# Set pixel at row 50, column 100 to white
array[50, 100] = 255

# Set bottom-right corner
array[199, 299] = 128Concept 2 — Understanding digital images
An RGB image is a 3D array of numbers. Each number represents the intensity of light for one colour channel at one pixel location. In NumPy, an RGB image has shape (height, width, 3). The three channels represent red, green, and blue intensities.
# RGB array: height × width × 3 channels
image = np.zeros((100, 150, 3), dtype=np.uint8)
# Shape: (height=100, width=150, channels=3)

# Access a specific pixel's RGB values
pixel = image[50, 75, :]  # Returns [R, G, B]

# Access just the red channel
red_channel = image[:, :, 0]Concept 3 — The RGB colour model
RGB is an additive colour model: start with darkness (black) and add colored light.
- Red
(255, 0, 0)→ pure red light - Green
(0, 255, 0)→ pure green light - Blue
(0, 0, 255)→ pure blue light - White
(255, 255, 255)→ all three at maximum - Black
(0, 0, 0)→ no light
Each channel stores values from 0 to 255 (8 bits = 256 possible values), giving 16,777,216 total colours (256³). This is called “24-bit true colour” and exceeds the ~10 million colours the human eye can discriminate.
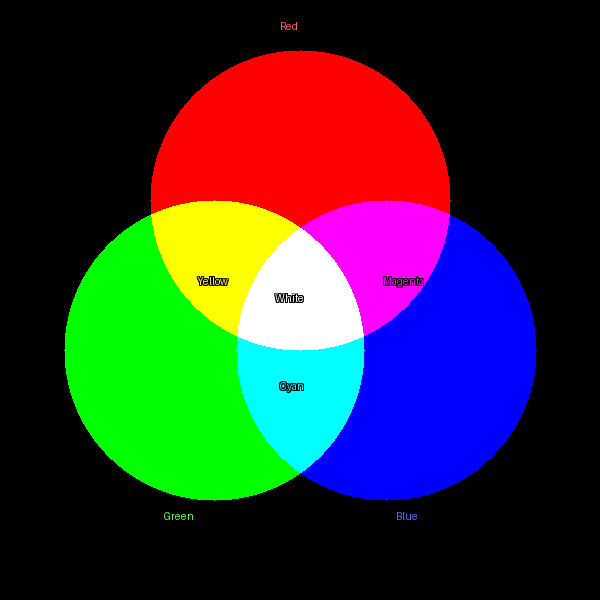
Common RGB colour patterns
- Primary colours: one channel at 255, others at 0.
- Secondary colours: two channels at 255, one at 0.
- Cyan
(0, 255, 255)= green + blue. - Magenta
(255, 0, 255)= red + blue. - Yellow
(255, 255, 0)= red + green.
- Cyan
- Grayscale: all three channels equal
(N, N, N). - Pastels: high values across all channels (light colours).
- Dark colours: low values across all channels.
Exercises
Three progressively challenging exercises, each building on the previous using the Execute → Modify → Create approach.
Run and predict
Run the following code and observe the output. Try to predict what colour you will see before running it.
import numpy as np
from PIL import Image

# Create a 150x150 image
image = np.zeros((150, 150, 3), dtype=np.uint8)

# Set all pixels to the same color
image[:, :, 0] = 255  # Red channel
image[:, :, 1] = 128  # Green channel
image[:, :, 2] = 0    # Blue channel

# Save and inspect
Image.fromarray(image).save('exercise1_color.png')
Reflection questions
- What colour appears? Why?
- What would happen if you set all three channels to 255?
- What would
(0, 0, 0)look like?
Solution & explanation
Answer: Orange (or orange-red).
Why: Red at maximum (255), green at half intensity (128), and blue absent (0) creates an orange hue. The colour (255, 128, 0) sits between pure red (255, 0, 0) and yellow (255, 255, 0).
- Setting all channels to 255 → white (all light).
- Setting all channels to 0 → black (no light).
Hit specific colours
Modify the code from Exercise 1 to produce each of these colours. Change only the three channel values.
Goals
- Create pure cyan (hint: which two colours of light make cyan?).
- Create a medium gray.
- Create a dark purple.
Solutions
1. Pure cyan
image[:, :, 0] = 0    # Red: off
image[:, :, 1] = 255  # Green: full
image[:, :, 2] = 255  # Blue: full
# Result: (0, 255, 255)
Cyan is a secondary colour formed by combining green and blue light.
2. Medium gray
image[:, :, 0] = 128
image[:, :, 1] = 128
image[:, :, 2] = 128
# Result: (128, 128, 128)
Grayscale occurs when all three channels are equal. The value determines brightness.
3. Dark purple
image[:, :, 0] = 64   # Red: low
image[:, :, 1] = 0    # Green: off
image[:, :, 2] = 96   # Blue: medium-low
# Result: (64, 0, 96)
Purple combines red and blue. Keep values low for a dark shade.
Build a gradient from scratch
Create something from scratch: a horizontal colour gradient that transitions smoothly from one colour to another.
Goal: a 200×200 image that transitions from pure red on the left to pure blue on the right.
Hints
- Use a
forloop over columns. - The red channel should decrease from left to right.
- The blue channel should increase from left to right.
- Calculate values proportionally:
value = column * 255 // width.
import numpy as np
from PIL import Image

# Create image
height, width = 200, 200
image = np.zeros((height, width, 3), dtype=np.uint8)

# Your code here: fill the image with a gradient.
# Loop over columns and set red and blue channels.

Image.fromarray(image).save('gradient.png')
Complete solution
import numpy as np
from PIL import Image

height, width = 200, 200
image = np.zeros((height, width, 3), dtype=np.uint8)

# Create gradient from red (left) to blue (right)
for col in range(width):
    image[:, col, 0] = 255 - (col * 255 // width)  # Red decreases
    image[:, col, 2] = col * 255 // width          # Blue increases
    # Green channel stays 0

Image.fromarray(image).save('red_to_blue_gradient.png')
How it works
col * 255 // widthcalculates a proportion: whencol=0(left edge), value is 0; whencol=width-1(right edge), value is ~255.- Red channel:
255 - proportionstarts at 255 (left) and decreases to 0 (right). - Blue channel:
proportionstarts at 0 (left) and increases to 255 (right). - The result is a smooth transition through purples in the middle where red and blue overlap.
Extension: try a vertical gradient, or one from yellow to cyan.
Challenge — diagonal gradient
Create a gradient that runs diagonally from red at top-left to blue at bottom-right.
Hints
- Consider both the row (y) and column (x) position.
- One approach: calculate a “progress” value from
(row + col) / (height + width - 2). - Red should be maximum at
(0, 0)and minimum at(height-1, width-1). Blue is the opposite.
This extends the horizontal gradient by requiring you to think in two dimensions simultaneously.
Downloads
rgb.py — combined script rgb_additive_mixing_diagram.py — diagram generatorSummary
In 15–20 minutes, three core concepts: grayscale, RGB, and array indexing.
Common pitfalls to avoid
- Don’t confuse RGB (additive / light) with CMYK (subtractive / paint).
- Remember:
image[row, column]— notimage[x, y]. - Always use
dtype=np.uint8for standard 0–255 image data. - Different libraries may use BGR instead of RGB (OpenCV in particular).
References
- [1] Foley, J. D., van Dam, A., Feiner, S. K., and Hughes, J. F. (1990). Computer Graphics: Principles and Practice (2nd ed.). Addison-Wesley. ISBN 0-201-12110-7.
- [2] Gonzalez, R. C. and Woods, R. E. (2007). Digital Image Processing (3rd ed.). Pearson.
- [3] Hunt, R. W. G. (2004). The Reproduction of Colour (6th ed.). Wiley. ISBN 0-470-02425-9.
- [4] Mayer, R. E. (2020). Multimedia Learning (3rd ed.). Cambridge University Press.
- [5] Sweller, J. and Cooper, G. (1985). The use of worked examples as a substitute for problem solving in learning algebra. Cognition and Instruction, 2(1), 59–89.
- [6] Harris, C. R., et al. (2020). Array programming with NumPy. Nature, 585, 357–362. doi:10.1038/s41586-020-2649-2
- [7] Clark, A. (2015). Pillow (PIL Fork) Documentation. pillow.readthedocs.io