1.3.1 Flags (Array Slicing)
Select and modify rectangular regions of NumPy arrays using slice notation. Build structured colour compositions — national flags — by combining row slices, column slices, and broadcasting.
Overview
Flags are structured patterns made of rectangular colour blocks. Creating them teaches you one of NumPy’s most powerful features: array slicing. You will learn to select and modify rectangular regions of images using simple slice notation, building the foundation for complex compositions and transformations.
Learning objectives
- Use NumPy slice notation
[start:stop]to select array regions. - Apply multi-dimensional slicing to RGB images
[rows, cols, channels]. - Create structured compositions by manipulating rectangular regions.
- Transfer slicing knowledge to tiling and pattern generation tasks.
Quick start — create your first flag
Let’s create the flag of France using vertical colour bands. Run this code:
import numpy as np
from PIL import Image

# Create blank canvas (standard 2:3 flag ratio)
height, width = 300, 450
flag = np.zeros((height, width, 3), dtype=np.uint8)

# Blue stripe (left third: columns 0-149)
flag[:, 0:150, 0] = 0    # Red channel
flag[:, 0:150, 1] = 85   # Green channel
flag[:, 0:150, 2] = 164  # Blue channel

# White stripe (middle third: columns 150-299)
flag[:, 150:300, :] = 255

# Red stripe (right third: columns 300-449)
flag[:, 300:450, 0] = 239
flag[:, 300:450, 1] = 65
flag[:, 300:450, 2] = 53

# Save the flag
result = Image.fromarray(flag, mode='RGB')
result.save('france_flag.png')
What you just did: You used NumPy array slicing to select vertical columns. The notation [:, 0:150] means “all rows, columns 0 to 149”. The colon : selects all rows, while 0:150 specifies which columns to modify.
Core concepts
Concept 1 — Array slicing syntax
Array slicing lets you select rectangular regions from arrays using the colon operator. For 2D images, the basic pattern is:
image[row_start:row_stop, col_start:col_stop]The fundamental rules:
startis inclusive,stopis exclusive:[0:100]selects indices 0 through 99.- Omitting values:
:alone means “all”,:10means “0 to 10”,10:means “10 to end”. - Negative indices:
-1is the last element,-10:selects the last 10 elements.
import numpy as np

# Create 200x300 image
img = np.zeros((200, 300, 3), dtype=np.uint8)

# Top half (rows 0-99)
img[0:100, :] = [255, 0, 0]  # Red

# Bottom half (rows 100-199)
img[100:200, :] = [0, 0, 255]  # Blue

# Right quarter (all rows, last 75 columns)
img[:, 225:] = [0, 255, 0]  # Green (overwrites part of each half)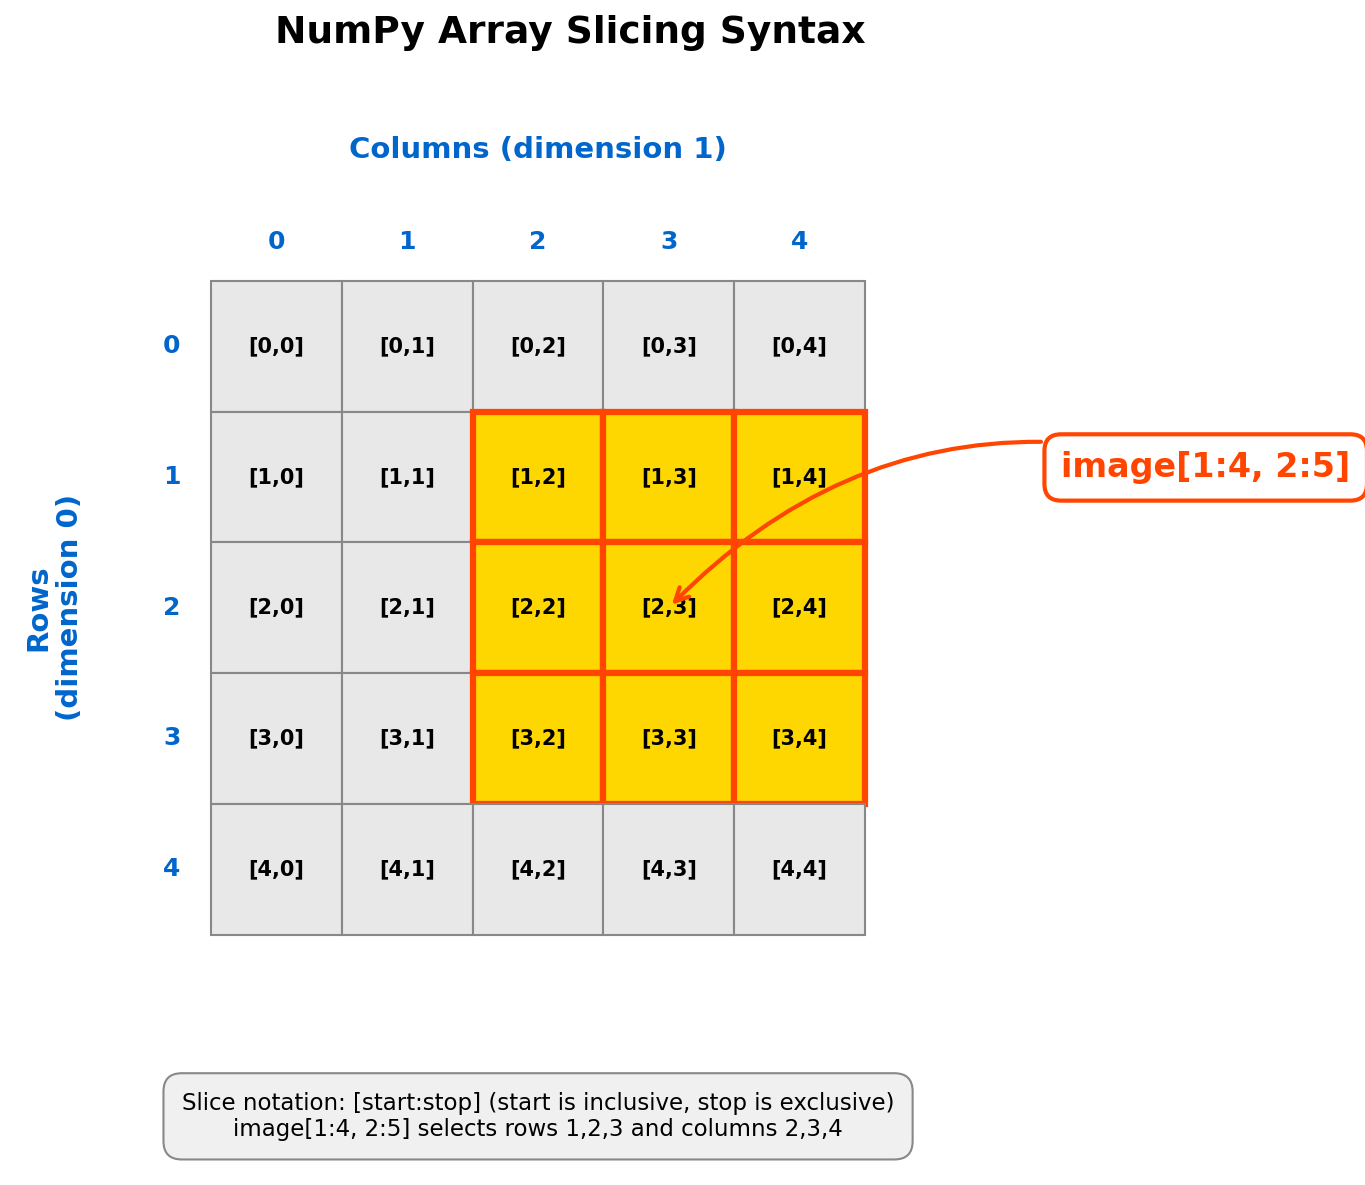
Concept 2 — Multi-dimensional slicing
RGB images are 3D arrays with shape (height, width, 3). The third dimension holds colour channels. You can slice across all three dimensions simultaneously:
import numpy as np

img = np.zeros((200, 300, 3), dtype=np.uint8)

# Select a rectangular region, all channels
img[0:100, 0:100, :] = [255, 0, 0]  # Top-left square, red

# Select entire red channel only
red_channel = img[:, :, 0]

# Select a single row across all channels (horizontal line)
horizontal_line = img[50, :, :]

# Select a single column across all channels (vertical line)
vertical_line = img[:, 100, :]
Broadcasting shortcut: NumPy automatically expands (broadcasts) values to match array dimensions. This means you can assign a single value or a short list to a multi-dimensional slice:
# These are equivalent:
img[0:100, 0:100, 0] = 255
img[0:100, 0:100, 1] = 0
img[0:100, 0:100, 2] = 0

# Can be written as (NumPy broadcasts the list):
img[0:100, 0:100] = [255, 0, 0]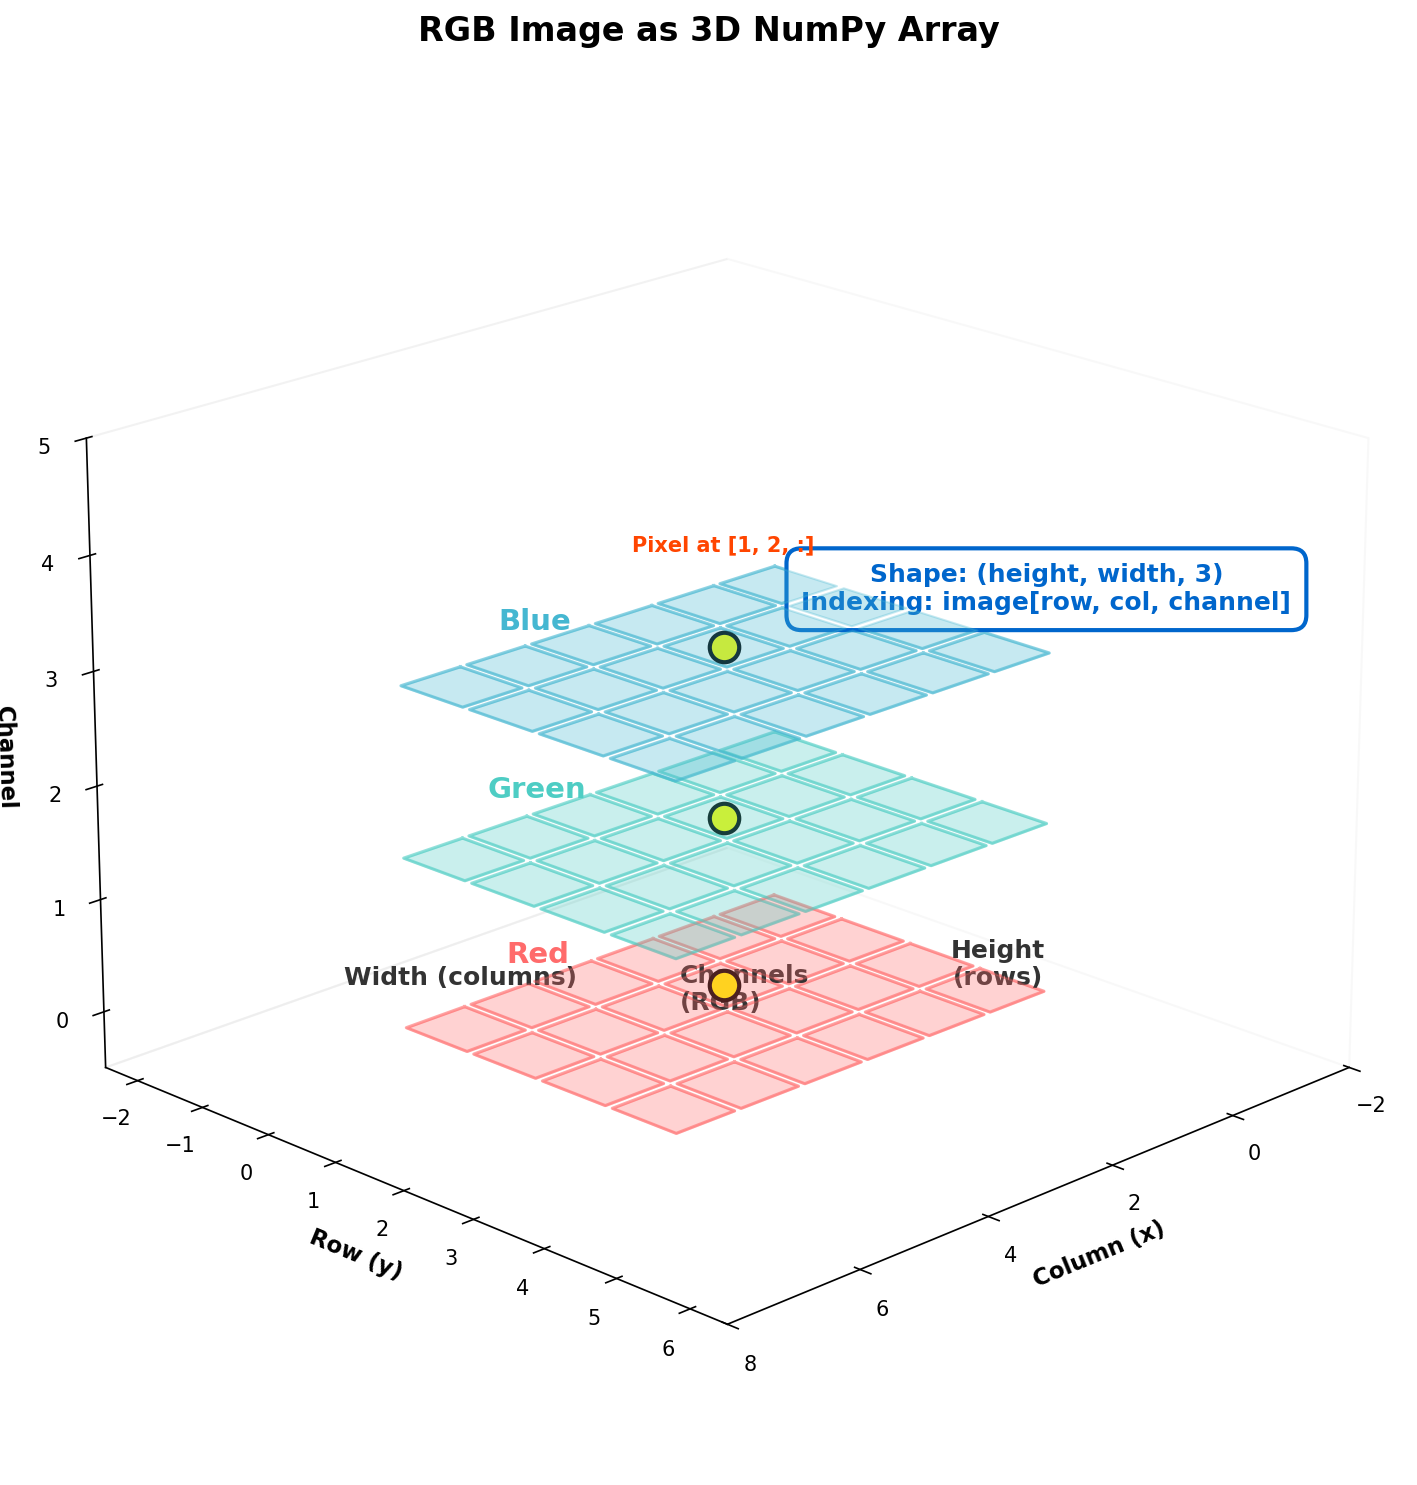
Exercises
Three progressively challenging exercises, each building on the previous using the Execute, Modify, Create approach.
Run the France flag
Run the France flag code from the Quick Start section and observe the output. Then answer the reflection questions below.
france_flag.py — France flag scriptReflection questions
- What does
[:, 0:150]select? Why does the colon alone select all rows? - Why does
flag[:, 150:300, :] = 255create white instead of requiring three separate channel assignments? - How would you modify the code to create horizontal stripes instead of vertical ones?
Answers
1. [:, 0:150] selects all rows, columns 0-149. The colon : without start or stop values means “select all elements in this dimension”. It is shorthand for [0:height].
2. Broadcasting. When you assign a single value (255) to a slice that includes all channels (: on the third dimension), NumPy automatically broadcasts that value to all three RGB channels, producing (255, 255, 255) which is white.
3. For horizontal stripes, switch the dimensions:
# Top stripe (rows 0-99)
flag[0:100, :] = [0, 85, 164]  # Blue

# Middle stripe (rows 100-199)
flag[100:200, :] = [255, 255, 255]  # White

# Bottom stripe (rows 200-299)
flag[200:300, :] = [239, 65, 53]  # Red
The key difference: [0:100, :] selects rows 0-99 and all columns (horizontal band), whereas [:, 0:100] selects all rows and columns 0-99 (vertical band).
Create the German flag
Modify the France flag code to create the flag of Germany (horizontal stripes: black on top, red in middle, gold on bottom).
Goals
- Switch orientation — change from vertical stripes to horizontal stripes.
What to expect
The key difference is which dimension you slice. Vertical stripes use [:, start:stop] (all rows, specific columns). Horizontal stripes use [start:stop, :] (specific rows, all columns).
- Divide into three equal bands — calculate the row boundaries.
What to expect
Divide the height into thirds. For height=300: rows 0-99, 100-199, 200-299. You can also calculate dynamically with height // 3 and 2 * height // 3.
- Apply the official German colours — Black
[0, 0, 0], Red[221, 0, 0], Gold[255, 206, 0].
What to expect
Each stripe gets a single colour assignment using broadcasting: flag[0:100, :, :] = [0, 0, 0] for the black band, and so on.
Complete solution
import numpy as np
from PIL import Image

# Create blank canvas
height, width = 300, 450
flag = np.zeros((height, width, 3), dtype=np.uint8)

# Black stripe (top third: rows 0-99)
flag[0:100, :, :] = [0, 0, 0]

# Red stripe (middle third: rows 100-199)
flag[100:200, :, :] = [221, 0, 0]

# Gold stripe (bottom third: rows 200-299)
flag[200:300, :, :] = [255, 206, 0]

# Save the flag
result = Image.fromarray(flag, mode='RGB')
result.save('germany_flag.png')
Extension challenge
Try creating the flag of the Netherlands (horizontal stripes: red, white, blue). Use official colours: Red [174, 28, 40], White [255, 255, 255], Blue [33, 70, 139].
Build the Swiss flag
Create the flag of Switzerland from scratch. This flag has a red field with a white cross at its centre, requiring you to combine both horizontal and vertical slicing.
Requirements
- Square format: 300 x 300 pixels.
- Red background:
[255, 0, 0]. - White cross:
[255, 255, 255]. - Cross proportions: bars are 1/5 of the flag dimension, centred.
Starter code
import numpy as np
from PIL import Image

# Create square flag (Switzerland uses 1:1 ratio)
size = 300
flag = np.zeros((size, size, 3), dtype=np.uint8)

# TODO Step 1: Fill entire background with red
# Hint: Use flag[:, :] = [255, 0, 0]

# TODO Step 2: Create vertical bar of cross (centred, white)
# The bar width should be size // 5 (60 pixels)
# Calculate left and right positions to centre it
# Hint: left = (size - bar_width) // 2

# TODO Step 3: Create horizontal bar of cross (centred, white)
# Same proportions as vertical bar

# Save
result = Image.fromarray(flag, mode='RGB')
result.save('switzerland_flag.png')Hint 1 — Red background
To fill the entire array with red, use:
flag[:, :] = [255, 0, 0]This selects all rows and all columns, then broadcasts the RGB value across every pixel.
Hint 2 — Centring calculations
For a bar with width bar_width centred in dimension size:
bar_width = size // 5  # 60 pixels for size=300
left = (size - bar_width) // 2  # (300 - 60) // 2 = 120
right = left + bar_width  # 120 + 60 = 180
So the vertical bar occupies columns 120-179 (centred).
Hint 3 — Combining horizontal and vertical bars
The cross is formed by two overlapping rectangles. The vertical bar spans all rows but only the centre columns. The horizontal bar spans all columns but only the centre rows. Where the two bars overlap, they both assign white, so the result is a clean cross.
Complete solution
import numpy as np
from PIL import Image

# Create square flag (Switzerland uses 1:1 ratio)
size = 300
flag = np.zeros((size, size, 3), dtype=np.uint8)

# Step 1: Fill background with red
flag[:, :] = [255, 0, 0]

# Step 2: Create white vertical bar (centred)
bar_width = size // 5  # 60 pixels
left = (size - bar_width) // 2  # 120
right = left + bar_width  # 180
flag[:, left:right, :] = 255  # White vertical bar

# Step 3: Create white horizontal bar (centred)
bar_height = size // 5  # 60 pixels
top = (size - bar_height) // 2  # 120
bottom = top + bar_height  # 180
flag[top:bottom, :, :] = 255  # White horizontal bar

# Save
result = Image.fromarray(flag, mode='RGB')
result.save('switzerland_flag.png')
Key insight: The cross is formed by two overlapping rectangles. Where they overlap, both set the same white colour, so the result is a perfect cross.

Make it your own
Try creating the flag of the United Kingdom. This challenging project requires diagonal lines, which you can create using loops and individual pixel manipulation.
Strategy:
- Start with a blue background:
flag[:, :] = [0, 33, 71]. - Add white diagonals using loops to set pixels along diagonal lines.
- Add the red cross (vertical and horizontal bars, like Switzerland).
- Add thinner red diagonals on top of the white ones.
# Diagonal from top-left to bottom-right
for i in range(min(height, width)):
    flag[i, i, :] = [255, 255, 255]

# Diagonal from top-right to bottom-left
for i in range(min(height, width)):
    flag[i, width - i - 1, :] = [255, 255, 255]
Experiment with line thickness and colours to match the official Union Jack design.
Downloads
france_flag.py — France flag (Execute) germany_flag.py — Germany flag (Modify solution) switzerland_flag.py — Switzerland flag (Create solution) switzerland_starter.py — Switzerland starter codeSummary
In 15-20 minutes, two core concepts: array slicing syntax and multi-dimensional slicing.
Common pitfalls to avoid
- Confusing row and column order: remember
[row, col]not[x, y]. Rows are vertical position, columns are horizontal. - Off-by-one errors:
[0:100]selects 100 elements (0-99), not 101. The stop index is exclusive. - Forgetting the channel dimension:
img[0:100, 0:100]modifies all channels. Useimg[0:100, 0:100, 0]for the red channel only.
Connection to future learning
The rectangular slicing you practised here is the foundation for:
- 1.3.2 (Repeat): tiling patterns using slicing to place repeated elements.
- 1.3.3-1.3.4: Truchet and Wang tiles (complex tiling systems).
- Module 3: image transformations and masking (selecting regions for effects).
- Module 7: image segmentation (dividing images into regions for analysis).
References
- [1] Harris, C. R., Millman, K. J., van der Walt, S. J., Gommers, R., Virtanen, P., Cournapeau, D., Wieser, E., Taylor, J., Berg, S., Smith, N. J., Kern, R., Picus, M., Hoyer, S., van Kerkwijk, M. H., Brett, M., Haldane, A., del Rio, J. F., Wiebe, M., Peterson, P., … Oliphant, T. E. (2020). Array programming with NumPy. Nature, 585(7825), 357-362. doi:10.1038/s41586-020-2649-2
- [2] Van Rossum, G., and Drake, F. L. (2009). Python 3 Reference Manual. CreateSpace. ISBN: 978-1-4414-1269-0.
- [3] NumPy Developers. (2024). Indexing on ndarrays. NumPy Documentation. Retrieved January 30, 2025, from numpy.org/doc/stable/user/basics.indexing.html
- [4] Gonzalez, R. C., and Woods, R. E. (2007). Digital Image Processing (3rd ed.). Pearson. ISBN: 978-0-13-168728-8.
- [5] Sweller, J., van Merriënboer, J. J. G., and Paas, F. (2019). Cognitive Architecture and Instructional Design: 20 Years Later. Educational Psychology Review, 31(2), 261-292. doi:10.1007/s10648-019-09465-5
- [6] Mayer, R. E. (2021). Multimedia Learning (3rd ed.). Cambridge University Press. ISBN: 978-1-108-89485-3.
- [7] Reas, C., and Fry, B. (2014). Getting Started with Processing: A Hands-On Introduction to Making Interactive Graphics (2nd ed.). Maker Media. ISBN: 978-1-4571-8707-4.