3.2.2 Meme Generator — Text on Images
Step out of NumPy briefly: use Pillow's `ImageDraw.text` and a TrueType font to layer captions onto a photo, then convert the result back into a NumPy array for further pixel work.
Overview
NumPy is excellent at moving pixels around, but it has no concept of type. Drawing a glyph means turning a TrueType outline into a rasterised silhouette and then alpha-blending that silhouette onto the canvas — a small ecosystem of font hinting, kerning, and anti-aliasing that you do not want to re-implement. Pillow’s ImageDraw.text wraps all of that in three lines [1]. This short lesson is the bridge between the pixel arrays you have been editing and a richer rendering surface, and the round-trip — np.array(image) and Image.fromarray(array) — is the same trick every later “annotate this output” workflow needs.
Learning objectives
- Open an image with Pillow and create an
ImageDraw.Drawsurface bound to its pixel buffer. - Load a TrueType font with
ImageFont.truetypeand calldraw.textto lay glyphs onto the canvas. - Convert between Pillow
Imageand NumPyndarraywithnp.array(...)andImage.fromarray(...). - Layer a translucent banner under a caption so it is legible over any background.
Quick start — two lines of caption
from PIL import Image, ImageDraw, ImageFont

img = Image.open('bridge.png')
draw = ImageDraw.Draw(img)
font = ImageFont.truetype('arial.ttf', 30)

draw.text((20, 390), 'All your dreams are on their way',
          fill='white', font=font)
draw.text((20, 430), '(Simon & Garfunkel)',
          fill='white', font=font)

img.save('bridge_meme.png')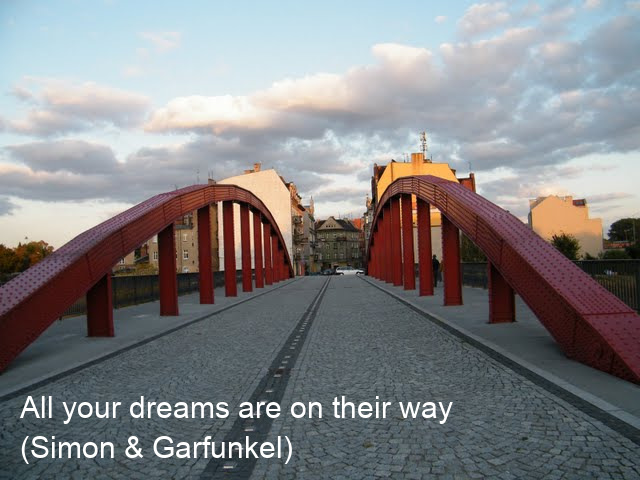
Core concepts
Concept 1 — Pillow’s drawing surface
Pillow’s Image object owns a pixel buffer; the ImageDraw.Draw wrapper exposes drawing methods that mutate that buffer. The constructor binds, not copies — so the same Image is what you eventually save:
img  = Image.open('bridge.png')
draw = ImageDraw.Draw(img)        # binds to img.load() — no copy
The draw object has methods for every primitive you might want: text, line, rectangle, polygon, ellipse, arc. The text call is the only one we need this lesson, but the rest are useful any time NumPy would force you to re-derive low-level rasterisation [2].
Concept 2 — TrueType fonts
Glyphs are not pixels; they are mathematical outlines. ImageFont.truetype loads a .ttf file at a given pixel size and prepares an internal rasteriser. You pass the resulting font object to every draw.text call:
font = ImageFont.truetype('arial.ttf', 30)   # 30 px height
draw.text((20, 390), 'caption', fill='white', font=font)
'arial.ttf' resolves from Pillow’s font search path; on Windows that path includes C:\Windows\Fonts, where Arial lives by default. If the font is not found, Pillow raises OSError; you can pass an absolute path instead. For lessons you should ship a small open-licensed font alongside the script — the DejaVu family is bundled with most Pillow installations and works cross-platform.
Concept 3 — Round-tripping with NumPy
The most important integration trick is the two-line round trip between Pillow and NumPy:
arr = np.array(img)              # Pillow → NumPy. Shape (H, W, 3) for RGB, uint8.
img = Image.fromarray(arr)       # NumPy → Pillow. Inferred mode from dtype + shape.
The pixel buffer is shared on the read; copied on the write. So a common workflow is:
- Open the image with Pillow.
- Convert to NumPy for vectorised pixel work (masks, channel swaps, distortions).
- Convert back to Pillow for text or shape drawing.
- Save.
Skipping the NumPy step is fine for “just add a caption” lessons like this one. Skipping the Pillow step is fine when you have no text or shape work to do. Most real pipelines hop back and forth as needed.
Exercises
Three exercises in Execute → Modify → Create order: run the quick start, vary the captioning, then build a translucent banner.
Run the captioned bridge
Run memegen.py from the downloads. It loads bridge.png, lays two captions near the bottom, and saves bridge_meme.png.
Reflection questions
- The first caption sits at
(20, 390); the second at(20, 430). Why are the y-values 40 apart given the font size is 30? - What happens if you pass
fill=(255, 255, 255, 128)(an RGBA tuple) instead of'white'? - Why does the script need
arial.ttfand not just the string'arial'?
Answers
40 px line gap, 30 px font — the gap is line spacing not glyph height. Even at a 30 px font, the descenders of a previous line and the ascenders of the next would touch at exactly 30 px gap. Adding 10 px of leading prevents that.
RGBA fill — for an RGB image Pillow drops the alpha channel; the fill effectively reduces to (255, 255, 255). For RGBA mode images (which support transparency), the same call paints the text with the alpha. Banner exercises in this module call img.convert('RGBA') first when they need that.
arial.ttf vs 'arial' — Pillow’s ImageFont.truetype wants a path to a font file. 'arial.ttf' resolves through the OS font search path. Bare 'arial' would be treated as a relative file name and fail unless you happen to have a file with that exact name in the working directory.
Three caption variations
Edit memegen.py to produce these three pictures.
Goals
- Top caption — move both lines to the top of the image.
- Bigger font, single line — combine the two captions into one and bump the font size to 48.
- Coloured caption — paint the caption in
(255, 200, 80)(a warm gold) instead of white.
Goal 1 — what to expect
draw.text((20, 20), 'All your dreams are on their way', fill='white', font=font)
draw.text((20, 60), '(Simon & Garfunkel)',              fill='white', font=font)
The captions move into the top-left corner. The 40 px line gap still holds; only y changes.
Goal 2 — what to expect
font = ImageFont.truetype('arial.ttf', 48)
draw.text((20, 380),
          'All your dreams are on their way — Simon & Garfunkel',
          fill='white', font=font)
One line, bigger glyphs. You may need to push y up further if the caption overflows the bottom edge.
Goal 3 — what to expect
draw.text((20, 390), 'All your dreams are on their way',
          fill=(255, 200, 80), font=font)
fill accepts any 3-tuple Pillow understands. RGB tuples are the most explicit; named strings like 'gold' or hex strings like '#FFC850' also work.
Translucent banner under the caption
Captions on busy backgrounds become unreadable. Build a translucent dark banner under the caption — a semi-transparent rectangle drawn as an RGBA overlay — so the text stays legible no matter what is behind it.
from PIL import Image, ImageDraw, ImageFont

# Open as RGBA so the overlay can be transparent
base = Image.open('bridge.png').convert('RGBA')
overlay = Image.new('RGBA', base.size, (0, 0, 0, 0))   # fully transparent

draw = ImageDraw.Draw(overlay)
font = ImageFont.truetype('arial.ttf', 30)

# TODO 1: draw a half-transparent black rectangle behind the caption area.
#         draw.rectangle((x0, y0, x1, y1), fill=(0, 0, 0, alpha))

# TODO 2: draw the two-line caption *on the overlay*, in solid white.

# TODO 3: alpha-composite the overlay onto the base, then save.
result = Image.alpha_composite(base, overlay).convert('RGB')
result.save('caption_with_banner.png')
Hint 1 — banner geometry
A banner from y = 370 down to y = 480 covering the whole width:
banner = (0, 370, base.size[0], 480)
draw.rectangle(banner, fill=(0, 0, 0, 160))   # alpha ~63% opaque
Lower the alpha (80) for a lighter touch; raise it (200) for almost-solid black.
Hint 2 — caption on top of the banner
draw.text((20, 385), 'All your dreams are on their way', fill='white', font=font)
draw.text((20, 425), '(Simon & Garfunkel)',              fill='white', font=font)
Same positions you used in the quick start; you do not need to repeat the banner offset because the banner is drawn behind via the overlay alpha.
Complete solution
from PIL import Image, ImageDraw, ImageFont

base = Image.open('bridge.png').convert('RGBA')
overlay = Image.new('RGBA', base.size, (0, 0, 0, 0))
draw = ImageDraw.Draw(overlay)
font = ImageFont.truetype('arial.ttf', 30)

# Translucent banner behind the caption
banner = (0, 370, base.size[0], 480)
draw.rectangle(banner, fill=(0, 0, 0, 160))

# Caption on top, solid white
draw.text((20, 385), 'All your dreams are on their way', fill='white', font=font)
draw.text((20, 425), '(Simon & Garfunkel)',              fill='white', font=font)

result = Image.alpha_composite(base, overlay).convert('RGB')
result.save('caption_with_banner.png')
How it works:
- The overlay is a fully-transparent RGBA image the same size as the base. Drawing on it never touches the base.
Image.alpha_composite(base, overlay)is the standard “paint A over B with A’s alpha” operation — exactly what Photoshop layers do.- The conversion back to RGB at the end strips the alpha channel for a final PNG that lossy-encodes well.
Make it your own
- Move the banner to the top of the image and add a gradient (lighter at the top, darker at the bottom) by drawing many one-pixel-tall rectangles with varying alpha.
- Use
font.getbbox(caption)to measure the caption width and draw the banner exactly as wide as the text rather than full-width. - Convert the captioned image back to NumPy with
np.array(result)and apply the wave distortion from 3.1.3 — the text gets warped along with the photo, which is one way to fake a print-on-fabric look.
Downloads
memegen.py — caption starter bridge.png — input photographSummary
Common pitfalls to avoid
- Pillow’s
(x, y)vs NumPy’s(row, col) = (y, x)— easy to get wrong when switching back and forth. - Calling
draw.textbeforetruetypeis set — Pillow falls back to its bitmap default font (small and crude). - Passing an RGBA tuple to an RGB image’s draw call — the alpha is silently dropped, which is rarely what you wanted.
- Saving as JPEG when the workflow uses RGBA — JPEG does not support transparency; PNG does.
- Forgetting that
ImageDraw.Draw(img)binds toimg. If you discard theDrawobject,imgalready has your edits.
References
- [1] Clark, A., et al. (2024). Pillow (PIL Fork) Documentation. pillow.readthedocs.io
- [2] Pillow Community. (2024). ImageDraw module. Pillow Documentation. pillow.readthedocs.io/ImageDraw
- [3] Apple Computer & Microsoft. (1995). TrueType Reference Manual. Apple Developer Documentation.
- [4] Bigelow, C., & Holmes, K. (1993). The design of a Unicode font. Electronic Publishing, 6(3), 289–305.
- [5] Porter, T., & Duff, T. (1984). Compositing digital images. ACM SIGGRAPH Computer Graphics, 18(3), 253–259. doi:10.1145/964965.808606
- [6] Harris, C. R., Millman, K. J., van der Walt, S. J., et al. (2020). Array programming with NumPy. Nature, 585, 357–362. doi:10.1038/s41586-020-2649-2